The Digital Workshop blog has moved

8 Jun

Thanks for visiting the ship’s website!  We haven’t shut down our blog operations, but rather we have moved all of our efforts into one main blog.  This is to ensure that the experience for you, the guest, is one that is slightly easier because of more frequent posts, fresher content, and knowing that everything is in one great place.  The URL for the new website is:

http://haldigitalworkshop.wordpress.com/

At this site you’ll find new content, great feedback from all of our Techsperts, as well as useful links like Handout Downloads, and great information from Windows.

Thank you all for your support and for following along with the Digital Workshop.

Scandinavian Landscapes!

3 Jun

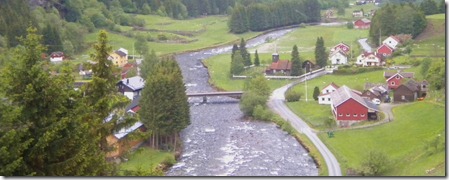
The Norwegian fjords offer some breathtaking vistas and great opportunities for photos.  Snowcapped mountains provide a beautiful backdrop for both crystal clear waters as well as colorful wildflowers – sometimes BOTH in one shot! You may have experienced less than optimal results when taking pictures like this using automatic mode, which tends to wash out the background or overexpose the foreground. For better photos of scenic Scandinavia, you may want to try switching your camera to landscape mode.  It’s perfect anytime you want both the foreground and background of a photo to be in focus.

Norway Landscape

Once in landscape mode, the camera will automatically choose settings so that areas of interest at different distances in the scene will be captured in focus.  It does this by using a smaller aperture to increase depth of field. A wide angle (short focal length = wide viewing angle) is typical for this type of shot to capture as much of the scene as possible.  Landscape mode is generally found on your Mode Dial or under the SCN dial or menu.

Whether in the Norwegian fjords or wherever your scenic view, try your hand at using landscape mode for some great pictures. And to learn more about this and other modes on your camera, come see us in the Digital Workshop for our “Say Cheese” class!  Just one of our various courses, “Say Cheese” helps you to get more out of your point and click digital camera.

-Techspert John

Camera Tip For Cruisers

18 May

Imagine losing your camera in a port of call. How would you ever hope to recover it?  Even if it was found by a “Good Samaritan,”  how would that nice person be able to reunite you with your camera and, more importantly, your memories?

Create a Digital “Reward Poster”

Before you leave home, the first picture you take on your new camera card should be one that can help to identify you in case your camera goes missing on your trip.  A picture of your business card would be good.  Even better, how about the picture of a homemade flyer on a standard piece of a paper that includes: your name, address, phone number and email address.  You might also include helpful information such as the name of your cruise ship and itinerary.  Last, but certainly not least, consider offering a reward for the safe return of your camera or (at least) your camera card.

By taking this small precaution, you provide the finder of your lost camera with a way to identify and contact you.

– Techspert John

Ryndam Crosses “The Pond”

3 May

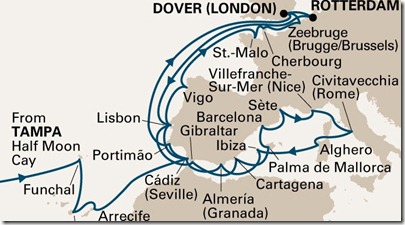
After a great Caribbean season, the ms Ryndam has now crossed the Atlantic Ocean in style! We enjoyed safe passage and good weather during our 21-day voyage. Departing from Tampa with a brief stop at Half Moon Cay, Bahamas, we spent nine days total at sea.  After stops in Dover and Rotterdam, we are now on our way to the Mediterranean Sea.

ryndam2011medmap (2) 

As you can imagine, the Digital Workshop has been hopping! A terrific group of fans became friends through the transatlantic voyage, and everyone enjoyed the culmination of our “Sea Week”. Most guests took the majority of classes before our ports of call began in earnest.

We appreciated everyone’s enthusiasm and enjoyed seeing the pictures you took in Canary Islands, Spain, Portugal, France and Belgium using techniques you learned in Digital Workshop classes. We look forward to seeing you again soon!

– Techspert John

Digital Workshop Handouts

2 Apr

Just a reminder to all who have participated in the Digital Workshop: updated handouts are periodically made available on the web.

Digital Workshop Powered By Windows

You can find the the most recent updates by going to:

http://haldigitalworkshop.wordpress.com

There you will find not only the updated handouts but also the latest information about the Digital Workshop Powered by Windows!

– Techspert John

Windows Internet Explorer 9

16 Mar

Microsoft has unveiled Internet Explorer 9, the newest version of its web browsing software. IE9 boasts faster performance and easier navigation, as well as other great features. The free download is only a click away and is a terrific complement to the Microsoft Live Essentials software we use here in the Digital Workshop.

ie9logo2

One of my favorite features is the “One Box”, which is simply the address bar. Now, as you type in a web address, IE9 searches simultaneously and gives suggestions as you type. If you don’t know the exact address for a web page, type in what you know and IE9 will help you find it!

In addition, you can now pin icons of favorite web sites directly to the task bar for simple, fast, one-touch browsing.  This builds on the concept taught in our Digital Workshop session “A New Window to Your World” wherein we learned how to pin your favorite software programs to your task bar.

Learn more about Internet Explorer 9 at http://Microsoft.com/IE9 and keep taking those pictures!

– Techspert John

Windows Live Essentials 2011

27 Feb

For those guests who have previously participated in the Digital Workshop on board the ms Ryndam, you will be happy to learn that Microsoft has released Windows Live Essentials 2011!

windowslivelogo

This is an update to all the the great programs used in the Digital Workshop including Windows Live Photo Gallery, Windows Live Mail, Windows Live Movie Maker and more!

Like prior versions, Windows Live Essentials 2011 is free and available by going to download.live.com.

-Techspert John

How To Take Pictures That Make a Great Panoramic

5 Feb

Hi Folks,

     Kristin here again, from the Digital Workshop on the MsRyndam bringing you another tip.  This tip is all about panoramics, specifically how to take a panoramic with your camera correctly in order make a panoramic successfully using Windows Live Photo Gallery.

     First of all, you can  use any type of camera that is out because what you need to do is take sequential pictures that have two things, overlap and steadiness.  Most of the time I just have my camera in regular auto mode.

Step 1:  Take a picture of your hand….yes, your hand.  This will allow you to correctly identify where you panoramic begins and ends.

Step 2:  Take you first picture.  Then move a little bit in the direction that you would like your panoramic to go (i.e. up, down, right or left) You MUST make sure that you overlap between pictures. For example, I take my first picture (click) I see that there is a tree in the right hand side of the picture, this means that I need to put this exact same tree in the left hand side of the next picture (click).  Try to make sure that you are as steady as possible when taking the pictures.  A trick that I use is to get a long piece of string, step on one end, hold the other end taught with my camera and then I am able to stay almost completely steady.

Step 3: After you take all your pictures that you want to use to create the panoramic, then take another picture of your hand. This will let you know where the panoramic ends.

Step 4: Load the pictures into the computer using Windows Live Photo Gallery.  Because you’ve taken the pictures of your hand you can see very cleary where you panoramic begins and end.  Hold down the control key and then select all the pictures that you have taken to create the panoramic.

Step 5: Go up to the CREATE panel in the ribbon at the top of your page.  Then  you will see the panoramic option on the left hand side.  Windows Live Photo Gallery stiches it together for you!  Then you must save the photo and viola! You now have a great panoramic that you can edit to your heart’s desire.

Advanced Windows Live Movie Maker 2011 Techniques: Trimming

21 Jan

Hi Everyone,

Kristin here, aboard the Ryndam, giving you a little demonstration about the trimming tool on Windows Live Movie Maker.

I’m sure we’ve all had an issue when taking our videos, either on a camcorder or digital camera, where we get some things that we just don’t like.  For example, your taking your video and then for the last 10 seconds your moving the camera all over the place, or at the beginning of the video your moving the camera all over the place trying to find the subject that you want to video.  No matter what the issue was, we’ve all done it.  But its a very quick and easy fix if you just put it into the Windows Live Movie Maker.

(1)     First things first is that you have to import in the video into Windows Live Movie Maker

(2) Then you need to select the movie in the slide show area and then navigate to the “Edit” panel at the top of your screen. In this panel you will find the trim tool.

(3) When you select the trim tool you then enable yourself to in effect “trim” the edges off of your movie.  Only at the beginning or the end.  For example, this movie that I have here is 30.9 seconds long.  Lets say i wanted to shorten it by 5 seconds from the beginning of the movie. 

Below the preview screen you will see two little tabs, one representing the beginning of the movie and the other representing the end.  You will need to move these tabs to trim your video.

If you see in the image below.  I have moved the first tab right to cut off 5.04 seconds from the beginning of my movie.  After you have made your adjustments all that is left is to just save the trim and viola! You have your new movie….which you must resave.

Hope this helps!

Cheers,

Kristin

Techspert: Ryndam, Digital Workshop powered by Windows

Which Laptop Should I buy?

1 Jan

One of the most commonly asked questions I get here in the Digital Workshop is, “Which laptop should I buy?”  The answer to that persons question is never the same because it all depends on the needs and wants of that person.  How much are you willing to spend?  What do you use you computer for?  What do you need your computer to do? Do you need a lot of memory?   What programs do you want to run on it?  Do you play games?  These are all questions that everyone has to ask themselves before they buy a new computer.  What I usually suggest to guests after they have taken the Its All Geek to Me class is that they utilize online filter programs.  Microsoft has one that is called PC Scout www.microsoft.com/Windows/pc-scout/ .  Letting you scout out PC’s that Microsoft approves of.  Amazon.com, Bestbuy.com and Wal-Mart all have these filters too.  You go into the website and check what you want out of a computer. 

For example:  I want 4GB or more of RAM.  When you select that option then the filter will take out all of the computers that don’t meet those specifications.  Then you narrow the search.  I want 500 GB or of hard drive space.  I want an I3 processor.  You keep on narrowing your wants until the filter brings up a small (or large) selection of computers that have all the specs that you want for you own PC.

Hope this helps my friends,

Kristin

Techspert/Ryndam